Hey everyone, welcome to our recipe page, if you're looking for Decorated Cookie House Hexen (Witch) House recipe, look no further! We provide you only the best Decorated Cookie House Hexen (Witch) House recipe here. We also have wide variety of recipes to try.
Before you jump to Decorated Cookie House Hexen (Witch) House recipe, you may want to read this short interesting healthy tips about Discover How to Improve Your Mood with Food.
A lot of us have been taught to think that comfort foods are bad and should be avoided. But if your comfort food is candy or junk food this can be true. Otherwise, comfort foods could be super nutritious and good for you. Some foods honestly do raise your mood when you consume them. If you are feeling a little bit down and need a happiness pick me up, try a few of these.
Some grains are actually excellent for repelling bad moods. Millet, quinoa, barley, etc are fantastic at helping you be happier. They fill you up better and that can help you with your moods too. It’s easy to feel a little bit off when you are starving! These grains can elevate your mood as it’s easy for your body to digest them. You digest them more quickly than other things which can help increase your blood sugar levels, which, in turn, helps make you feel better, mood wise.
See, you don’t need to consume all that junk food when you are wanting to feel better! Go with these hints instead!
We hope you got insight from reading it, now let’s go back to decorated cookie house hexen (witch) house recipe. You can have decorated cookie house hexen (witch) house using 13 ingredients and 31 steps. Here is how you achieve that.
The ingredients needed to make Decorated Cookie House Hexen (Witch) House:
- Get The cookie dough:
- Take 80 grams Unsalted butter
- Prepare 100 grams Sugar
- You need 30 grams Honey
- Use 1 dash Vanilla oil
- Get 50 grams Egg
- You need 300 grams Cake flour
- Provide 1 Beaten egg for egg wash
- Provide For the icing:
- Prepare 200 grams Powdered sugar
- Use 30 grams Egg white
- Provide To finish:
- Take 1 Silver dragées and other edible decorations
Instructions to make Decorated Cookie House Hexen (Witch) House:
- Make the pattern. Think up a house design you like, draw the pattern out on thick paper, and cut them out. See steps 3 to 8 for the parts you'll need. Please use the dimensions as a reference.
- I will explain how to make this hexen (witch) house.
- The pattern for the front and back of the house. Cut out windows and a door in the front of the house.
- The pattern for the side walls.
- The pattern for the roof.
- Pattern 1 for the chimney.
- Patterns 2 and 3 for the chimney.
- Pine trees.
- Make the cooke dough. Add the sugar to the softened butter and mix well with a whisk. Add the honey and vanilla, and mix well.
- Have the egg at room temperature. Beat the egg, and add it little by little to the butter mix in step 9, stirring well between additions. Add the sifted cake flour and mix until it forms a dough.
- Wrap the dough in plastic film, and let it rest in a cool place (not in the refrigerator) for several hours.
- Roll the dough out 4 to 5 mm thick on a dusted work surface. Place the pattern pieces on top and cut around them with a knife.
- Roll up the remaining dough, press a tart tin on it to cut it out and remove the excess dough to make the base.
- The cookie parts you need: 1 base; 1 whole and 2 half-pine tree shapes; 1 chimney pattern 1 and 1 reversed version of chimney pattern 1; 1 each of chimney patterns 2 and 3…
- …1 piece each of the front and back of the house; 2 side walls; 2 roof pieces. Put them on a parchment paper lined baking tin, being careful not to mess them up.
- Brush with the egg wash, and bake in a preheated 180 °C oven for 14 to 15 minutes. Cool on a rack when they're baked.
- Make the icing. Put the powdered sugar in a bowl, add the egg white and mix well. Put into a piping bag. Thicker icing sticks better. Adjust the consistency with the amount of egg white added.
- Put the parts together using icing as glue. Spread the icing on the chimney parts as shown in this photo and stick together.
- When they are stuck together, put the chimney on it's side and leave until the icing has dried.
- Spread icing on the straight edges of the pine tree half-pieces, and stick them onto both sides of the full-piece pine tree piece and leave to dry. Decorate as you wish after it's dried.
- Spread icing on the edges of the side walls, stick on the front and back walls to assemble. Hold it with your hands for a few minutes until the icing has hardened a bit.
- The roof is heavy, so make some supports under it before sticking it on. Leave the supports in place until the icing has dried completely.
- When the roof has dried, stick on the chimney. Hold it on for a few minutes until it has stuck. If it doesn't slide off when you release it, leave the house to dry completely.
- If the roof of your house is not very steep like mine, it may not need supports and it may be easier to put a chimney on too. I think a house with a not so steep roof line is easier to assemble.
- The chimney is hard to stick on to the roof if there are jagged bits of cookie on the edges, so gently file them down to fit the rooftop so that it adheres better.
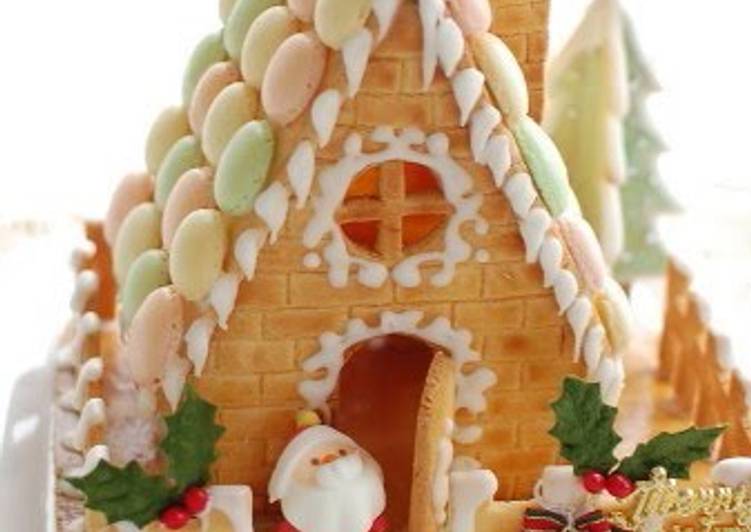
- Once the house is assembled, decorate the roof and sides with icing in any pattern you like. You can stick on cookies or sugar decorations too.
- If you pipe out some icing so that it hangs from the edge of the roof it looks like icicles. Pipe some icing on the roof and chimney so that it looks like snow.
- Stick the house onto the base. When everything has dried completely it's done. You can sprinkle on some powdered sugar if you like.
- I made a hole in the base and inserted a small LED light.
- It was hard to take the light in and out by the base, so I made a hole in the back of the house instead for this version. This house is about 20 cm square, and uses 1.5 times the dough in this recipe.
- I stuck macarons and chocolates on this house, and used a dredge to make a brick pattern on the walls.
If you find this Decorated Cookie House Hexen (Witch) House recipe helpful please share it to your close friends or family, thank you and good luck.